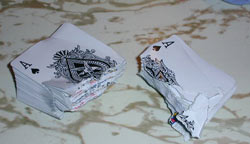

Tearing a Deck of Cards

by Clay edgin
Update dec. 2004: Clay Rolling up a Frying pan!!
Ever been burned real bad at the blackjack table? Sure, who hasn’t! Here is your chance to get revenge. In this article, we’re going to explore the different techniques in tearing a deck of cards and I’ll give you some suggestions on how to work up to your first full deck of cards and beyond.
Tearing cards has been a feat of strength for well over a century, and the most famous professional strongmen at the turn of the century could stack 2, 3, and even 4 decks of cards together and rip them in half! It should be noted, however, that decks of cards today are tougher than the decks of yore because most modern decks are made with a plastic coasting that makes them stronger. While I’m not trying to take anything away from these famous strongmen, the differences in cards should be noted. Nevertheless, tearing any deck of cards will definitely make people’s eyes pop and jaws drop.
Your typical deck of cards costs anywhere from $.50 to $5.00 depending on where you shop, so if you’re going to do this you should hit the dollar stores for two reasons: (1) the cards are cheap (my local store carries 2 packs for a dollar), and (2) they are easier to tear than the name-brand cards such as Hoyle and Bicycle. Casinos also carry gently used packs of cards for pretty cheap. And there’s a chance that you’ll be able to buy the very same deck of cards that cost you big money at the blackjack table!
Tearing a deck of cards is equal parts technique and strength. Let’s break them both down below:
The Techniques:
Below are a series of pictures showing the typical hand placements on a deck. The hand placement in Figure 1 with the hands on the same side of the deck is how I normally do my tearing these days, and Figure 2 shows how I used to tear. I later switched to the first grip because it gave me a little more power in the beginning of the tear. Figure 3 shows yet another grip that was taught to me by an experienced rock climber and grip enthusiast. Because of the very powerful index and middle fingers he developed from rock climbing, this style was easiest for him. Play around with the different grips during the different phases of the tear to find out where you are the most effective.

Figure One

Figure Two

Figure Three
I try to tear with intensity, but I prefer to slowly rip through the deck rather than blast through it. It is much more satisfying to me to “feel” the deck tearing and then separating. Your thumbs, index fingers, and middle fingers will play the biggest role in tearing the deck, so the whole time you are grasping the deck in your hands, squeeze very hard as if you were trying to fuse your fingers to the deck. Imagine that you’ve a pair of vice grips for hands and clamp down on those cards. It seems that the heaviest burden of the deck tear lies with the thumb being strong enough to pinch the deck. That leads me to my next subject…
The Strength
You will need strong thumbs, index fingers, and middle fingers to hold onto the cards as you are twisting, and strong enough wrists to twist and tear the deck. Your ability to pinch relatively narrow objects firmly will come in really handy here. There are several exercises I would recommend if you want to develop strong enough hands to tear a deck:
- Sledgehammer levering – hold a sledgehammer out to your side and, using only your wrist, let the hammer head slowly make its way down to your face as in Figure 4 and then back up again. Do this slowly and with a light weight (6-8lbs) at first just to get the feel of it and start adding weight to make it heavier. You can do this by either sliding the weight down the handle of the hammer or duct taping it to the end. If you’re already levering a 16lb sledge or heavier, stop reading this article and go tear some cards! You can also lever the sledge to the front of you and side to side.

Figure 4
- Narrow pinching – Not everybody has a narrow pinch block to lift, but if you’ve got a block of wood less than 3/4” thick and can attach a chain and weights to it, then you’ve got a worthwhile homemade training tool for tearing a deck of cards. A narrow pinch block is valuable for your grip training anyways.
The Training
When I first started to learn how to tear a deck of cards, I started by taking 20 cards, getting them into a good grip, and then twisting. When I could tear 20 cards, I tried 25 and when I could do that, then 30, 35, etc. This is why I recommend you go to the dollar store to get your cards, unless you like spending lots of money!
Intensity while training is very important, but never push yourself to the point of injury. There is a difference between pain and injury - pain means that you are trying to be stronger than you actually are. Tomorrow, the pain will go away and you’ll be stronger but if you are injured you’ll be even weaker. Without going into more detail, there are a lot of bones, tendons, and muscles in your hands and wrists and hurting them sets your training back.
If you’re a beginner, practice tearing your pre-determined number of cards, sledgehammer levering, and narrow pinching only a few times a week for a couple weeks. Then start to do higher volume, more cards, and heavier weight gradually. The hands and wrists are remarkable in their ability to recover quickly, but you don’t want to overdo it at first. As you become an advanced grip enthusiast, you can make good gains training your hands hard 4-7 days a week. A typical day’s training would consist of:
- 25 card stack tear
- Another 25 card stack tear
- Sledgehammer levering – 6lb hammer held by end of handle, levered down to face 5-6 times with each hand
- More levering – 6lb hammer held by end of handle,
levered side to side 5 to 6 times.
- NOTE: if you cannot completely lever the hammer down to your nose safely and under control, choke up on the handle so it becomes a little easier, then work your way towards the end of the handle as you get stronger
- Narrow pinching – load up some weights on your apparatus and do 4-5 lifts with each hand. You can also do timed holds where you hold the weight in the air for 7-10 seconds. These are lots of fun and more and more pinch grip enthusiasts swear by them.
- Total time: Approximately 20-30 minutes with rest time between sets
If your wrists become sore, I’d recommend contrast baths. Fill up two buckets or the two compartments of your sink with water; one side will be very hot and the other will be cold. Soak your hands in one bucket, stretching and flexing your hands and wrists, then switch to the cold bucket for a little while. This does wonders.
The Twist
Okay, so now you’ve worked up to thicker stacks of cards and are ready to tackle an entire deck right! Good! Take what you’ve learned, grip the cards, take a deep breath, and let’s go! Below are some pictures of a deck being torn in various stages:

Figure 5 – initial tear

Figure 6 – mostly torn

Figure 7 – completely torn deck
Congratulations! That’s some good tearing! Now head back to that blackjack table and see if you can bet the dealer that you have an original way of cutting the deck that she hasn’t seen before…
Check out the bio of Clay below for more information!
March 2004 Heavy Sports Athlete of the Month--Clay Edgin
Click here for more information on this
23 yr-old 'gripmaster'.
Clay tears playing cards, rolls frying pans, bends nails
and horseshoes among
other strongman feats of strength for fun!
 Check out
this video of Clay "rolling up" a frying pan!!
Heavy Grips™ Hand-Grippers are perfect for:
Archery
Armwrestling
Baseball
Basketball BodyBuilding
Bowling
Birthday and
Christmas Gifts
Fencing
Fishing
Football
Father's Day
Gifts!!
Golfing / Golfers
Gymnastics
Highland Games
Hockey
Judo
Karate
Kayaking
Lacrosse
Martial Arts
Rowing
Rugby
Pole Vaulting
Polo
Racquet Sports
Shoot Fighting
Shot Put
Strength Training
Strongman
Strongwoman
Tae Kwon Doe
Track & Field
Tennis
Volleyball
Xmas Gifts!!
Bring your game to the next level with
the Heavy Grips handgrips!


